# Webpack 性能优化
Webpack 性能优化 我会从几个大章节来讲述
# 压缩优化
# 深度 TreeShaking
- webpack-deep-scope-plugin
- webpack-parallel-uglify-plugin
- purifycss-webpack
# HTML 压缩
HtmlWebpackPlugins (opens new window)压缩推荐选项
new HtmlWebpackPlugin({
  inlineSource: ".css$",
  template: path.join(__dirname, `src/${pageName}/index.html`),
  filename: `${pageName}.html`,
  chunks: ["vendors", pageName],
  inject: true,
  minify: {
    html5: true,
    collapseWhitespace: true,
    preserveLineBreaks: false,
    minifyCSS: true,
    minifyJS: true,
    removeComments: false,
  },
});
2
3
4
5
6
7
8
9
10
11
12
13
14
15
# 图片压缩
image-webpack-loader (opens new window)
rules: [
  {
    test: /\.(gif|png|jpe?g|svg)$/i,
    use: [
      "file-loader",
      {
        loader: "image-webpack-loader",
        options: {
          bypassOnDebug: true, // webpack@1.x
          disable: true, // webpack@2.x and newer
        },
      },
    ],
  },
];
2
3
4
5
6
7
8
9
10
11
12
13
14
15
# CSS 压缩
optimize-css-assets-webpack-plugin (opens new window)
const OptimizeCSSAssetsPlugin = require('optimize-css-assets-webpack-plugin');

optimization: {
    minimizer: [
        new OptimizeCSSAssetsPlugin({}),
    ],
},
2
3
4
5
6
7
# 打包速度优化
# 代码求值
prepack-webpack-plugin (opens new window) 可以对之前的代码求值,让下次打包更快
const PrepackWebpackPlugin = require("prepack-webpack-plugin").default;

const configuration = {};
plugins: [new PrepackWebpackPlugin(configuration)];
2
3
4
# speed-measure-webpack-plugin
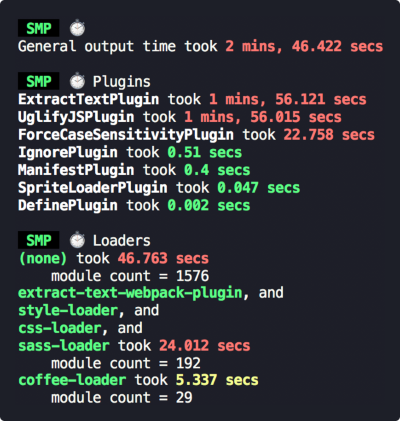
speed-measure-webpack-plugin (opens new window) 打包速度分析
const SpeedMeasurePlugin = require("speed-measure-webpack-plugin");
const smp = new SpeedMeasurePlugin();
module.exports = smp.wrap(webpackConfig);
2
3
# cache-loader
通过上面的工具,可以分析到那个 loader 速度过慢,我们就可以使用 cache-loader (opens new window)
rules: [
    {
        test: /\.js$/,
        use: ['cache-loader', 'babel-loader'],
        include: path.resolve('src'),
    },
],
2
3
4
5
6
7
# hard-source-webpack-plugin
如果你想开启全局的编译压缩可以使用 hard-source-webpack-plugin (opens new window)
plugins: [new HardSourceWebpackPlugin()];
# externals 代码拆分
externals 配置去掉不需要编译的,可以抛弃 dll
splitChunks: {
  chunks: 'async',
  minSize: 30000,
  minChunks: 1,
  maxAsyncRequests: 5,
  maxInitialRequests: 3,
  name: false,
  cacheGroups: {
    commons: {
      chunks: 'initial',
      minChunks: 2,
      maxInitialRequests: 5,
      minSize: 0,
      name: 'commons',
    },
  },
}
2
3
4
5
6
7
8
9
10
11
12
13
14
15
16
17
分离⻚⾯公⽤包 html-webpack-externals-plugin (opens new window)
# 动态引入
# @babel/plugin-syntax-dynamic-import
@babel/plugin-syntax-dynamic-import (opens new window)用以解析识别 import()动态导入语法---并非转换,而是解析识别
npm install --save-dev @babel/plugin-syntax-dynamic-import
.babelrc
{
  "plugins": ["@babel/plugin-syntax-dynamic-import"]
}
2
3
# 动态 polyfill
- js 脚本直接引入,不编译
<script src="https://cdn.polyfill.io/v2/polyfill.min.js?feature=Map,Set"></script>
使⽤动态 polyfill,它会根据你的浏览器 UA 头,判断你是否⽀持某些特性,从⽽返回给你⼀个合适的 polyfill
<script type="module" src="main.js"></script>
<script nomodule src="main.es5.js"></script>
2
- 项目配置
npm install --save @babel/polyfill
项目入口引入 @babel/polyfill
import "@babel/polyfill";
此时打包会发现体积很大,下面配置根据自己的业务代码去加载对应的 polyfill
{
    test: /\.js$/,
    exclude: /node_modules/,
    loader: "babel-loader",
    options: {
        "presets": [['@babel/preset-env', {
            useBuiltIns: 'usage'
        }]]
    }
}
2
3
4
5
6
7
8
9
10
设置浏览器兼容版本
{
    loader: "babel-loader",
    options: {
        "presets": [['@babel/preset-env', {
            "targets": {
                "edge": "17",
                "firefox": "60",
                "chrome": "67",
                "safari": "11.1",
            }
        ]]
    }
},
2
3
4
5
6
7
8
9
10
11
12
13
# 配置优化
# noParse
这是 module 中的一个属性,作用:不去解析属性值代表的库的依赖,配置也很简单
noParse:/jquery/ ,//不去解析jquery中的依赖库
# resolveLoader
如果我们编写了自定义的 Loarder,我们 需要引用 path.resolve(__dirname, './loaders/replaceLoader.js') 很不雅观,我们可以通过设置 resolveLoader 来达到和正常的 loader 引入一样
resolveLoader: {
  modules: ["node_modules", "loaders"];
}
2
3
# resolve
合理的配置 alias 可以让我们在引用路径的时候更加方便,过多的配置会影响打包速度
resolve: {
    alias: {
        '@': resolve('src/web')
    }
}
2
3
4
5
# shimming
使用 shimming 的配置如下
const webpack = require("webpack");
plugins: [
  new webpack.ProvidePlugin({
    $: "jquery",
  }),
];
2
3
4
5
6
如果一个模块中使用了 $ 字符串,就会在模块中自动得引用 jquery
# 生产力工具
# progress-bar-webpack-plugin
打包进度展示,progress-bar-webpack-plugin (opens new window)
# friendly-errors-webpack-plugin
friendly-errors-webpack-plugin (opens new window) 识别某些类别的 webpack 错误,并清理,聚合和优先级,以提供更好的开发人员体验。
配合 webpack-dev-server 使用
const FriendlyErrorsWebpackPlugin = require('friendly-errors-webpack-plugin');
new FriendlyErrorsWebpackPlugin({
    compilationSuccessInfo: {
        messages: ['You application is running here http://localhost:8080'],
        notes: [
            'Some additionnal notes to be displayed unpon successful compilation',
        ],
    },
    onErrors: function (severity, errors) {
        //安装node-notifier 只想提示错误的话
    },
    quiet: true,
    clearConsole: true,
}),
2
3
4
5
6
7
8
9
10
11
12
13
14
# SpeedMeasurePlugin

loader 插件运行时间分析,插件速度分析
# webpack-build-notifier
webpack-build-notifier (opens new window) 可以更好的提示你运行状态

# webpack-bundle-analyzer
webpack-bundle-analyzer (opens new window) 是一款在线可视化分析你打包文件的工具,可以让你清楚的看到每个文件的大小
const BundleAnalyzerPlugin = require("webpack-bundle-analyzer")
  .BundleAnalyzerPlugin;
plugins: [new BundleAnalyzerPlugin()];
2
3

# webpack-dashboard
webpack-dashboard (opens new window) 增强了 webpack 的输出,包含依赖的大小、进度和其他细节
# 资源引用
inline-manifest-webpack-plugin (opens new window) 把 runtime 放到 html 里
html-inline-css-webpack-plugin (opens new window) 把一些核心的 CSS 放到⻚面内部
html-webpack-inline-source-plugin (opens new window) 内部资源引入
copy-webpack-plugin (opens new window) 用就是拷贝文件,或者文件夹
# 更多的构建工具
lerna (opens new window) 用于管理具有多个包的 JavaScript 项目
brunch (opens new window) 超快的 HTML5 构建工具
rome (opens new window) Facebook 最新 JS 工具
snowpack (opens new window) 号称提高 10 倍打包速度
看到这里你以为就完了吗
# 彩蛋
你是否经常会开多个终端窗口,一多人就懵逼了,别怕
node-bash-title (opens new window) 设置终端 title
set-iterm2-badge (opens new window) 设置终端背景
const setTitle = require("node-bash-title");
const setIterm2Badge = require("set-iterm2-badge");
setTitle("🍻  Webpack开发环境配置");
setIterm2Badge("🍻 Dev开发");
2
3
4
← webpack 打包 初识vite →