# 端实现画中画,让网页飞出浏览器
# Document Picture-in-Picture 介绍
文档画中画 (Document Picture-in-Picture, 本文简称 PiP)
# 🎬 视频流媒体的画中画功能
你可能已经在视频平台(如腾讯视频、哔哩哔哩等网页)见过这种效果:视频播放时,可以点击画中画后。无论你切换页面,它都始终显示在屏幕的最上层,非常适合上班偷偷看电视 💻

体验网址:Treasure-Navigation (opens new window)
# 📖 Document Picture-in-Picture 详细教程
# 🛠 HTML 基本代码结构
首先,我们随便写一个简单的 HTML 页面,后续的 JS 和样式都会基于它实现。
<!DOCTYPE html>
<html lang="en">
  <head>
    <meta charset="UTF-8" />
    <meta name="viewport" content="width=device-width, initial-scale=1.0" />
    <title>Document Picture-in-Picture API 示例</title>
    <style>
      #pipContent {
        width: 600px;
        height: 300px;
        background: pink;
        font-size: 20px;
      }
    </style>
  </head>

  <body>
    <div id="container">
      <div id="pipContent">这是一个将要放入画中画的 div 元素!</div>
      <button id="clickBtn">切换画中画</button>
    </div>
    <script>
      // 在这里写你的 JavaScript 代码
    </script>
  </body>
</html>
2
3
4
5
6
7
8
9
10
11
12
13
14
15
16
17
18
19
20
21
22
23
24
25
26
# 1️. 请求 PiP 窗口
PiP 的核心方法是 window.documentPictureInPicture.requestWindow。它是一个 异步方法,返回一个新创建的 window 对象。 PIP 窗口可以将其看作一个新的网页,但它始终悬浮在屏幕上方。
document.getElementById("clickBtn").addEventListener("click", async function() {
  // 获取将要放入 PiP 窗口的 DOM 元素
  const pipContent = document.getElementById("pipContent");
  // 请求创建一个 PiP 窗口
  const pipWindow = await window.documentPictureInPicture.requestWindow({
    width: 200, // 设置窗口的宽度
    height: 300, // 设置窗口的高度
  });

  // 将原始元素添加到 PiP 窗口中
  pipWindow.document.body.appendChild(pipContent);
});
2
3
4
5
6
7
8
9
10
11
12
# 演示:

👏 现在,我们已经成功创建了一个画中画窗口! 这段代码展示了如何将网页中的元素放入一个新的画中画窗口,并让它悬浮在最上面。非常简单吧
# 关闭 PIP 窗口
可以直接点右上角关闭 PIP 窗口,如果我们想在代码中实现关闭,直接调用 window 上的 api 就可以了
window.documentPictureInPicture.window.close();
# 2️. 检查是否支持 PiP 功能
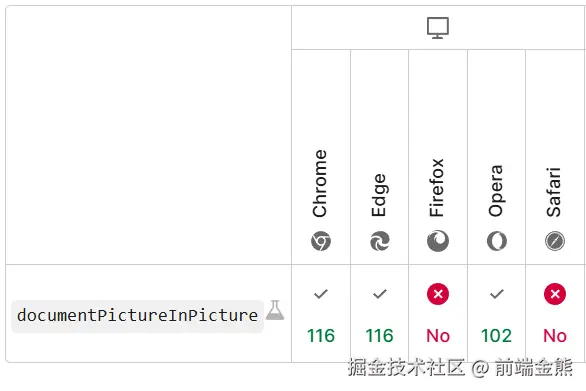
一切不能兼容浏览器的功能介绍都是耍流氓,我们需要检查浏览器是否支持 PIIP 功能。 实际就是检查 documentPictureInPicture 属性是否存在于 window 上 🔧
if ("documentPictureInPicture" in window) {
  console.log("🚀 浏览器支持 PiP 功能!");
} else {
  console.warn("⚠️ 当前浏览器不支持 PiP 功能,更新浏览器或者换台电脑吧!");
}
2
3
4
5
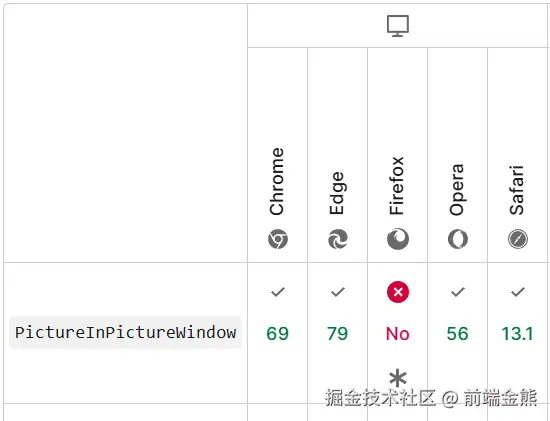
如果是只需要将视频实现画中画功能,视频画中画 (Picture-in-Picture) 的兼容性会好一点,但是它只能将<video>元素放入画中画窗口。它与本文介绍的 文档画中画(Document Picture-in-Picture) 使用方法也是十分相似的。
# 3️. 设置 PiP 样式
我们会发现刚刚创建的画中画没有样式,一点都不美观。那是因为我们只放入了 dom 元素,没有添加 css 样式。
# 3.1. 全局样式同步
假设网页中的所有样式如下:
<head>
  <style>
    #pipContent {
      width: 600px;
      height: 300px;
      background: pink;
      font-size: 20px;
    }
  </style>
  <link rel="stylesheet" type="text/css" href="https://abc.css" />
</head>
2
3
4
5
6
7
8
9
10
11
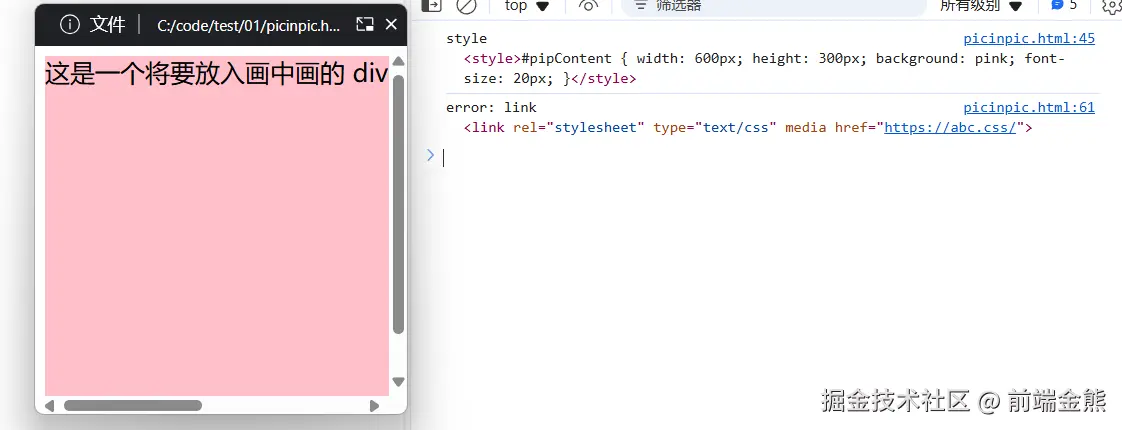
为了方便,我们可以直接把之前的网页的 css 样式全部赋值给画中画。
// 1. document.styleSheets获取所有的css样式信息
[...document.styleSheets].forEach((styleSheet) => {
  try {
    // 转成字符串方便赋值
    const cssRules = [...styleSheet.cssRules]
      .map((rule) => rule.cssText)
      .join("");
    // 创建style标签
    const style = document.createElement("style");
    // 设置为之前页面中的css信息
    style.textContent = cssRules;
    console.log("style", style);
    // 把style标签放到画中画的<head><head/>标签中
    pipWindow.document.head.appendChild(style);
  } catch (e) {
    // 通过 link 引入样式,如果有跨域,访问styleSheet.cssRules时会报错。没有跨域则不会报错
    const link = document.createElement("link");
    /**
     * rel = stylesheet 导入样式表
     * type: 对应的格式
     * media: 媒体查询(如 screen and (max-width: 600px))
     *  href: 外部样式表的 URL
     */
    link.rel = "stylesheet";
    link.type = styleSheet.type;
    link.media = styleSheet.media;
    link.href = styleSheet.href ?? "";
    console.log("error: link", link);
    pipWindow.document.head.appendChild(link);
  }
});
2
3
4
5
6
7
8
9
10
11
12
13
14
15
16
17
18
19
20
21
22
23
24
25
26
27
28
29
30
31
# 演示:
# 3.2. 使用 link 引入外部 CSS 文件

向其他普通 html 文件一样,可以通过 link 标签引入特定 css 文件:
创建 pip.css 文件:
#pipContent {
  width: 600px;
  height: 300px;
  background: skyblue;
}
2
3
4
5
js 引用:
// 其他不变
const link = document.createElement("link");
link.rel = "stylesheet";
link.href = "./pip.css"; // 引入外部 CSS 文件
pipWindow.document.head.appendChild(link);
pipWindow.document.body.appendChild(pipContent);
2
3
4
5
6
# 演示:
# 3.3. 媒体查询的支持


可以设置媒体查询 @media (display-mode: picture-in-picture)。在普通页面中会自动忽略样式,在画中画模式会自动渲染样式
<style>
  #pipContent {
    width: 600px;
    height: 300px;
    background: pink;
    font-size: 20px;
  }

  <!-- 普通网页中会忽略 -- > @media (display-mode: picture-in-picture) {
    #pipContent {
      background: lightgreen;
    }
  }
</style>
2
3
4
5
6
7
8
9
10
11
12
13
14
在普通页面中显示为粉色,在画中画自动变为浅绿色
# 演示:
# 4️. 监听进入和退出 PiP 模式的事件

我们还可以为 PiP 窗口 添加事件监听,监控画中画模式的 进入 和 退出。这样,你就可以在用户操作时,做出相应的反馈,比如显示提示或执行其他操作。
// 进入 PIP 事件
documentPictureInPicture.addEventListener("enter", (event) => {
  console.log("已进入 PIP 窗口");
});

const pipWindow = await window.documentPictureInPicture.requestWindow({
  width: 200,
  height: 300,
});
// 退出 PIP 事件
pipWindow.addEventListener("pagehide", (event) => {
  console.log("已退出 PIP 窗口");
});
2
3
4
5
6
7
8
9
10
11
12
13
# 演示
# 5️. 监听 PiP 焦点和失焦事件
const pipWindow = await window.documentPictureInPicture.requestWindow({
  width: 200,
  height: 300,
});

pipWindow.addEventListener("focus", () => {
  console.log("PiP 窗口进入了焦点状态");
});

pipWindow.addEventListener("blur", () => {
  console.log("PiP 窗口失去了焦点");
});
2
3
4
5
6
7
8
9
10
11
12
# 演示
# 6. 克隆节点画中画

我们会发现我们把原始元素传入到 PIP 窗口后,原来窗口中的元素就不见了。 我们可以把原始元素克隆后再传入给 PIP 窗口,这样原始窗口中的元素就不会消失了
const pipContent = document.getElementById("pipContent");
const pipWindow = await window.documentPictureInPicture.requestWindow({
  width: 200,
  height: 300,
});
// 核心代码:pipContent.cloneNode(true)
pipWindow.document.body.appendChild(pipContent.cloneNode(true));
2
3
4
5
6
7
# 演示
# PIP 完整示例代码
<!DOCTYPE html>
<html lang="en">
<head>
    <meta charset="UTF-8">
    <meta name="viewport" content="width=device-width, initial-scale=1.0">
    <title>Document Picture-in-Picture API 示例</title>
    <style>
        #pipContent {
            width: 600px;
            height: 300px;
            background: pink;
            font-size: 20px;
        }
    </style>
</head>
<body>
    <div id="container">
        <div id="pipContent">这是一个将要放入画中画的 div 元素!</div>
        <button id="clickBtn">切换画中画</button>
    </div>

    <script>
        // 检查是否支持 PiP 功能
        if ('documentPictureInPicture' in window) {
            console.log("🚀 浏览器支持 PiP 功能!");
        } else {
            console.warn("⚠️ 当前浏览器不支持 PiP 功能,更新浏览器或者换台电脑吧!");
        }

        // 请求 PiP 窗口
        document.getElementById("clickBtn").addEventListener("click", async function () {
            const pipContent = document.getElementById("pipContent");

            // 请求创建一个 PiP 窗口
            const pipWindow = await window.documentPictureInPicture.requestWindow({
                width: 200,  // 设置窗口的宽度
                height: 300  // 设置窗口的高度
            });

            // 将原始元素克隆并添加到 PiP 窗口中
            pipWindow.document.body.appendChild(pipContent.cloneNode(true));

            // 设置 PiP 样式同步
            [...document.styleSheets].forEach((styleSheet) => {
                try {
                    const cssRules = [...styleSheet.cssRules].map((rule) => rule.cssText).join('');
                    const style = document.createElement('style');
                    style.textContent = cssRules;
                    pipWindow.document.head.appendChild(style);
                } catch (e) {
                    const link = document.createElement('link');
                    link.rel = 'stylesheet';
                    link.type = styleSheet.type;
                    link.media = styleSheet.media;
                    link.href = styleSheet.href ?? '';
                    pipWindow.document.head.appendChild(link);
                }
            });

            // 监听进入和退出 PiP 模式的事件
            pipWindow.addEventListener("pagehide", (event) => {
                console.log("已退出 PIP 窗口");
            });

            pipWindow.addEventListener('focus', () => {
                console.log("PiP 窗口进入了焦点状态");
            });

            pipWindow.addEventListener('blur', () => {
                console.log("PiP 窗口失去了焦点");
            });
        });

        // 关闭 PiP 窗口
        // pipWindow.close();  // 可以手动调用关闭窗口
    </script>
</body>
</html>
2
3
4
5
6
7
8
9
10
11
12
13
14
15
16
17
18
19
20
21
22
23
24
25
26
27
28
29
30
31
32
33
34
35
36
37
38
39
40
41
42
43
44
45
46
47
48
49
50
51
52
53
54
55
56
57
58
59
60
61
62
63
64
65
66
67
68
69
70
71
72
73
74
75
76
77
78
79
# 总结
🎉 你现在已经掌握了如何使用 Document Picture-in-Picture API 来悬浮任意 HTML 内容! 希望能带来更灵活的交互体验。✨